How to Create a Gallery Wall Layout That Feels Balanced
Learning how to create a gallery wall layout starts with the wall itself: its usable width and height, nearby furniture, and any doors or windows. Plan the display as one shape before deciding where each print goes. That makes it easier to balance different sizes, choose consistent gaps, and preview the grouping before you hang anything.
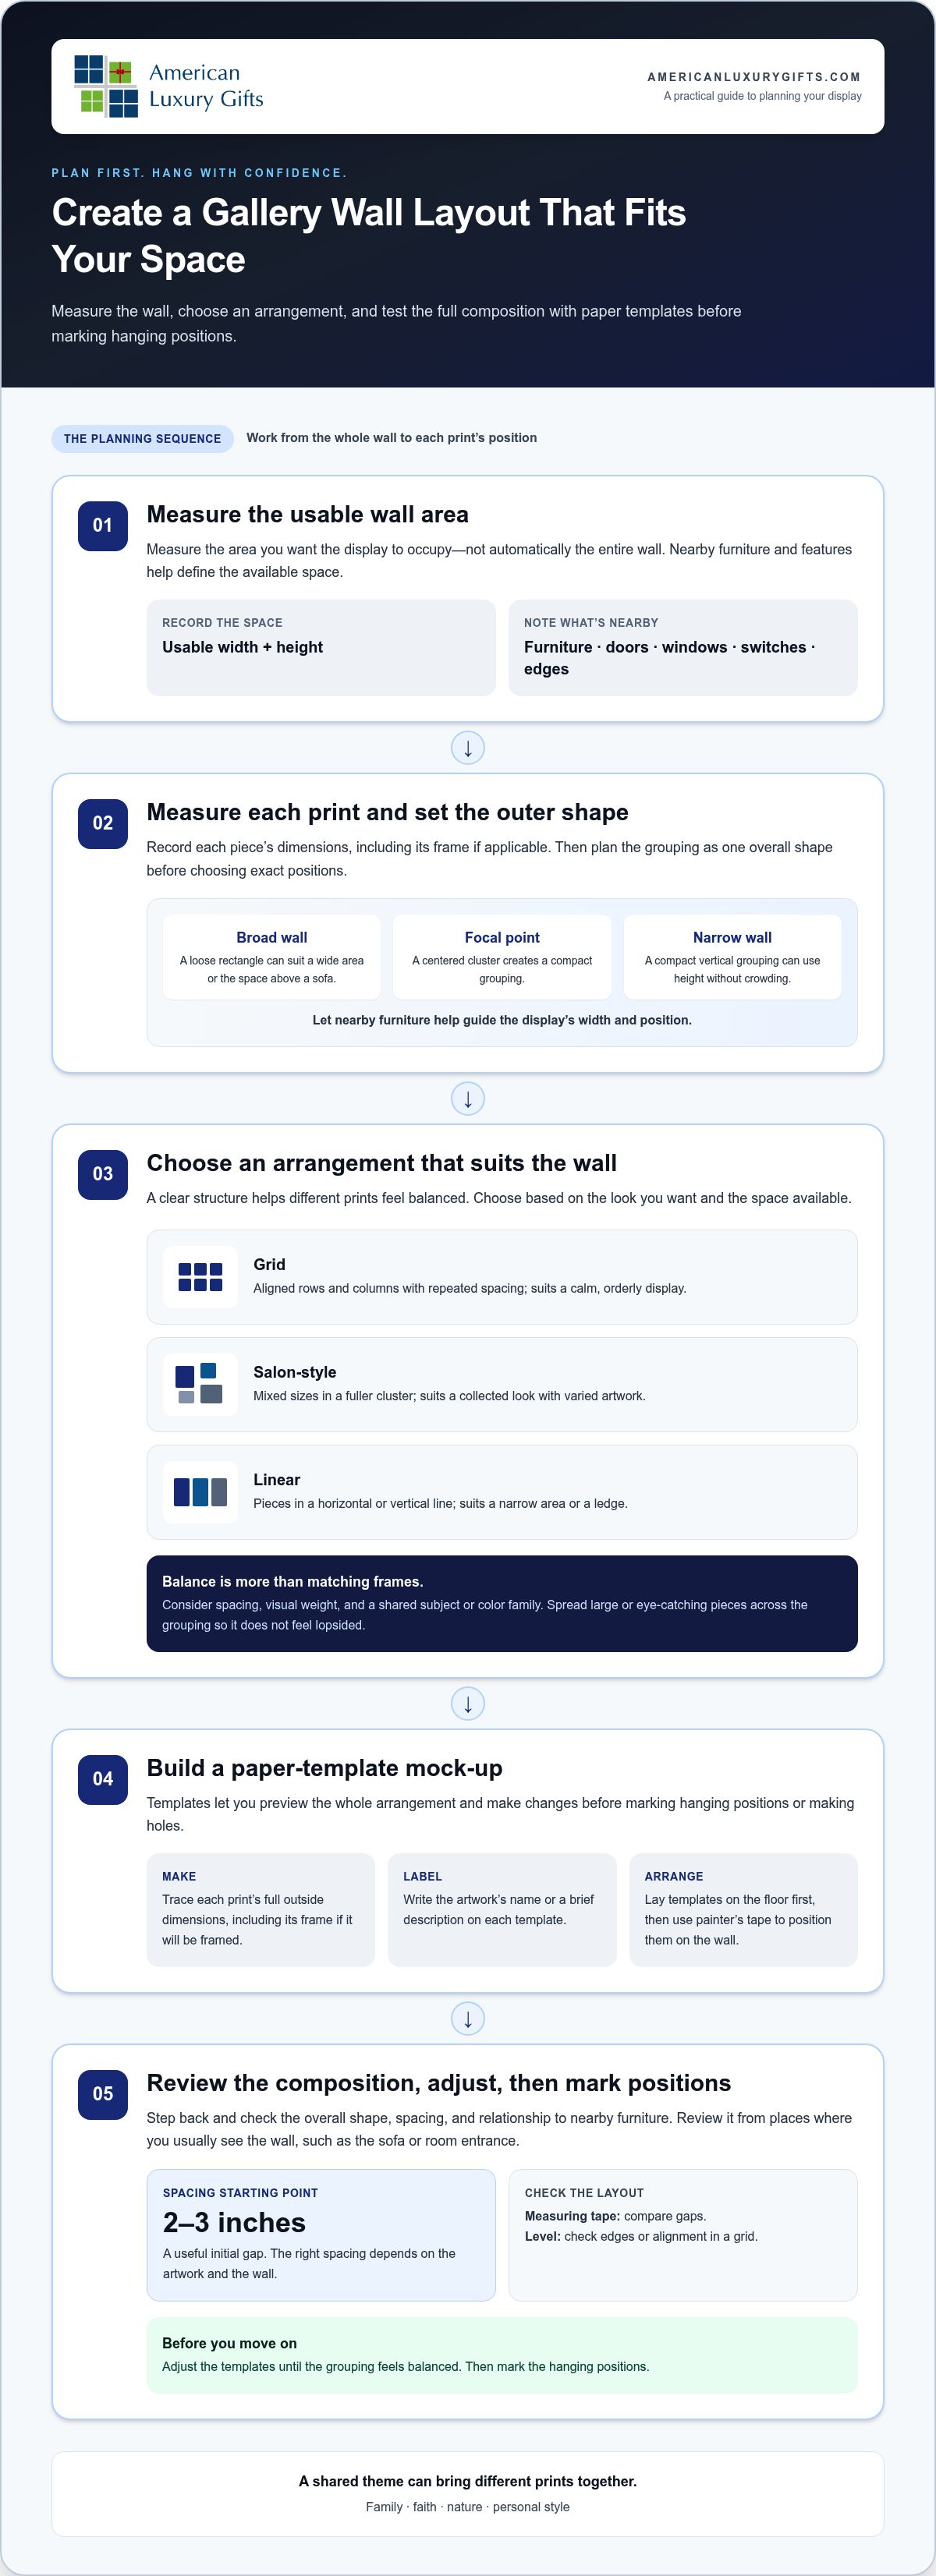
To create a balanced layout, measure the area, choose a grid, salon-style, or linear arrangement, and map each piece with paper templates. Check the spacing and overall shape from across the room, then adjust the templates before marking hanging positions. A shared theme, such as family, faith, or nature, can help different prints feel connected.
This process works for family photographs, inspirational prints, or art that reflects your faith and personal style. A little planning makes it easier to create a display that suits both your space and the meaning you want it to express.
Key Takeaways
- Measure the usable wall area and plan the display’s outer shape before hanging prints.
- Choose a grid, salon-style, or linear arrangement based on the wall and the artwork you have.
- Use paper templates and painter’s tape to preview the composition and adjust it before marking hanging positions.
- Bring together prints that reflect your family, faith, interests, or style for a more personal display.
How Do You Create a Gallery Wall Layout That Fits Your Space?
Measure the usable wall area, plan the grouping’s outer shape, test the arrangement, and then hang the prints. A gallery-wall layout is a planned arrangement of multiple pieces that reads as one display. Start with the group as a whole, rather than choosing a spot for each print at random. This gives you a clear boundary and helps the display feel connected to the room.
Note what shares the wall, including furniture, doors, windows, switches, and nearby edges. These features define the space you can use and can help you decide whether the display should be compact, wide, or tall. The word “gallery” has several meanings, as shown in Gallery (disambiguation); here, it means a thoughtfully arranged display in your home.
For a visual walkthrough of choosing an arrangement, watch this video:
What should you measure before planning a gallery wall?
Measure the area you want the display to occupy, not automatically the full wall. A sofa, doorway, or window may define a smaller usable zone. Record its width and height, then measure each print, including its frame if you plan to use one. With those dimensions, you can estimate the grouping’s footprint and avoid crowding nearby features.
How do you choose a layout shape?
Choose an outer boundary before placing individual prints. A loose rectangle can suit a broad wall or the area above a sofa. A centered cluster creates a compact focal point, while an asymmetrical grouping can make mixed sizes feel relaxed but intentional. Relate the shape to what’s beneath it: above a console, the display might echo the furniture’s width without extending far beyond it. On a narrow wall, a compact vertical grouping can use the height without making the space feel crowded.
To begin how to create a gallery wall layout, follow this sequence:
- Measure the usable wall area and note obstacles.
- Record each piece’s dimensions, including the frame if applicable.
- Choose an outer shape that suits the wall and nearby furniture.
- Arrange the prints within that boundary, then test the composition before hanging.
Which Gallery Wall Arrangement Makes Different Prints Feel Balanced?
Choose an arrangement that suits the wall and gives the prints a visual connection. A grid creates order through repeated alignment, a salon-style display feels collected and layered, and a linear arrangement keeps the composition simple. Balance doesn’t require matching frames or identical dimensions. It comes from spacing, visual weight, and a shared subject or color family. These ideas also appear in UC Berkeley Library’s Design Fundamentals: Elements & Principles.
| Arrangement | Structure | Works well when |
|---|---|---|
| Grid | Aligned rows and columns with repeated spacing | You want a calm, orderly display |
| Salon-style | Mixed sizes arranged in a fuller cluster | You want a collected look with varied artwork |
| Linear | Pieces arranged in a horizontal or vertical line | You want a clean display along a narrow area or ledge |
For example, a family-themed grouping might pair one larger family print with smaller inspirational or nature prints. A shared palette or subject helps different sizes feel related. Distributing the largest or most eye-catching pieces across the grouping also helps keep it from feeling lopsided.
When does a grid layout work best?
A grid works well when you want a structured, quiet effect. Aligned edges and repeated gaps create a clear rhythm, so the arrangement feels deliberate rather than scattered. Similar dimensions make alignment easier, but mixed sizes can work too if you establish consistent edges, such as aligning centers or the bottoms of pieces in each row. Keep the pattern simple enough to read at a glance.
How can an asymmetrical gallery wall still look intentional?
Balance visual weight instead of mirroring both sides. A large, dark, or detailed print may draw more attention than a smaller, lighter piece, so distribute prominent artwork across the grouping. For instance, offset one large family print with two smaller pieces on the opposite side. A shared theme, such as faith, family, or nature, can tie different subjects and dimensions together.
As you decide how to create a gallery wall layout, let the theme guide the feeling and the arrangement provide the structure. If you’re gathering prints around a personal story, explore meaningful wall art.
How Do You Test Gallery Wall Spacing Before Hanging the Prints?
Preview the arrangement with paper templates before marking hanging points or making holes. Cut each template to match the full outside dimensions of its print or frame, arrange the pieces on the floor, then use painter’s tape to place them on the wall. You can review the overall shape, spacing, and relationship to nearby furniture while changes are still easy.
How do you make paper templates for a gallery wall?
Use paper, kraft paper, or another lightweight material. Trace each piece using its full outside dimensions, including the frame if you’ll hang the print framed. Label each template with the artwork’s name or a brief description so you can keep track of which piece belongs in each position.
Arrange the templates on the floor first. When the composition looks promising, transfer it to the wall with painter’s tape. Keep the templates in place and step back to see how the grouping reads from a distance.
How do you check spacing and alignment?
A spacing of about 2 to 3 inches is a useful starting point, though the right gap depends on the artwork and the wall. Use a measuring tape to compare spaces and a level to check edges or alignment in a grid. Different print dimensions create varied outlines, so focus on whether the gaps feel consistent across the grouping.
Review the mock-up from the places where you usually see the wall, such as the sofa or room entrance. Check that the arrangement feels balanced, doesn’t crowd nearby furniture, and has a clear outer shape. If one area looks cramped, shift a template or widen the gap. If the composition feels too spread out, bring pieces closer together. Adjust the paper until the layout feels settled.
Confirm each print’s order and position before drilling. Mark hanging points only after you’re confident in the arrangement. This rehearsal helps you make a layout that fits your room and avoid unnecessary rearranging.
How Do You Finalize and Hang a Meaningful Gallery Wall?
Finalize the arrangement when the mock-up feels settled. Confirm the grouping, spacing, order, and visual center, then mark hanging positions and choose hardware suited to the wall and artwork. A consistent theme, such as family, faith, motivation, or nature, can make prints with different designs feel like one personal display.
What should you check before hanging each piece?
Use the approved paper layout as your guide. Before hanging, check that every print matches its planned position and orientation, then recheck the gaps and alignment across the full grouping. Step back once more to see how the display feels in the room.
Decide where the grouping’s visual center should sit. As a general reference, the center of a gallery wall is often placed about 57 inches from the floor. Above a sofa or headboard, the research guidance recommends placing the bottom of the frames 6 to 8 inches above it. Treat these measurements as starting points and account for the room and furniture in front of you.
Mark hanging positions only when the mock-up is final. Select hardware based on the wall surface, the artwork’s weight, and its hanging method. One type of hardware won’t suit every wall or piece. Hang carefully and check alignment as you go.
How can you make the gallery wall feel personal?
Let one connecting idea guide your choices. Family prints can sit alongside a meaningful quote, while faith-based art can be balanced with quieter nature imagery. Varying the visual emphasis helps the wall feel expressive without making it difficult to take in. American Luxury Gifts offers themed physical prints, including inspirational, family, Christian and spiritual, and animals and nature wall art, to help you build a display around what matters to you.
For more guidance on choosing artwork for your home, read How to Choose and Style Wall Art Prints for a Meaningful Home. Once your prints are in place, take a final look from the room’s usual viewing spots. Small adjustments can bring the arrangement together.
If you have a question about choosing prints for your gallery wall, contact American Luxury Gifts.
Bring Your Gallery Wall Plan to Life
A balanced gallery wall begins with the space you have, not a guess about where each print should go. Measure the usable area, choose an arrangement that suits your artwork, and preview the composition with paper templates before marking hanging points. Consistent spacing and a shared theme can help different sizes and designs feel connected.
As you decide how to create a gallery wall layout, keep the goal personal as well as polished. Prints that reflect your family, faith, favorite places, or sources of inspiration can make the display feel at home in your space. American Luxury Gifts is an American-owned e-commerce brand offering themed physical wall-art prints for meaningful displays.
Take your time with the mock-up, adjust the grouping until it feels right, and then hang with confidence. Browse American Luxury Gifts’ themed wall art to find prints that suit the story you want your gallery wall to tell.
Frequently Asked Questions
How do you create a gallery wall layout without making holes first?
Use paper templates to preview how to create a gallery wall layout before hanging anything. Trace each print or frame at its full outside dimensions, label the templates, and arrange them on the floor. Then use painter’s tape to place them temporarily on the wall. Step back from your usual viewing spot to check the grouping, spacing, and relationship to furniture. Adjust the templates before marking hanging points.
Should gallery wall frames match?
No, gallery wall frames don’t have to match. A consistent frame style can create a formal, unified look, while a mix of finishes and shapes can feel collected and personal. To keep varied frames from looking random, connect the artwork with a shared theme, color family, or similar visual weight. Family prints in different frames, for example, can still feel cohesive when their colors or subjects relate.
How much space should be between pictures on a gallery wall?
A gap of about 2 to 3 inches between frames is a useful starting point. Keep the spacing visually consistent, then adjust if the pieces are especially large or the wall area is compact. Measure the gaps rather than relying only on sight, and assess the full arrangement from across the room. Even spacing helps different prints read as one intentional display.
Where should the largest picture go in a gallery wall?
Place the largest picture where it can anchor the grouping without making one side feel heavier than the other. It often works near the center, but an off-center position can also feel balanced if smaller pieces counter its visual weight nearby. Consider the artwork’s colors and details as well as its dimensions. A dark or visually bold print may draw more attention than a lighter piece of equal size.
Can you mix different art styles in one gallery wall?
Yes. Different art styles can share a gallery wall when something connects them, such as a subject, color palette, mood, or personal story. Mixing framed photography with original painted canvases—crafted with quality materials from Art Parts Fine Arts—can add depth and texture to your arrangement. Inspirational text prints and nature artwork, for instance, also work well together when their colors complement each other. Leave enough visual breathing room so expressive pieces don’t compete for attention.
How do you plan a gallery wall around furniture?
Measure the wall area above or beside the furniture, then plan the grouping around that usable space rather than the entire wall. Above a sofa or headboard, a common guideline is to leave about 6 to 8 inches between the furniture and the bottom of the frames. Consider the furniture’s width and nearby doors or windows, then preview the arrangement before hanging to check its balance.


